
Get Started with Tesorai Search
Tesorai Search processes raw mass spectrometry data into peptide and protein identifications and quantification results. This guide covers job setup, from selecting files to reviewing the credit estimate and launching the search.
If you already have processed results, see Analyze Your Own Results. To explore public studies without uploading raw files, see Using Trove.
1. Prepare your spectra and FASTA database
Section titled “1. Prepare your spectra and FASTA database”You will need spectra files and a FASTA protein sequence database appropriate to your organism and experiment.
| Instrument | Spectra upload format |
|---|---|
| Thermo Fisher | Native .raw or .RAW files |
| Bruker | A .zip containing the entire .d folder |
| SCIEX | Centroided .mzML files |
Upload your spectra and .fasta database on the Data page. You can also
add spectra during job setup using Add more files in the file-selection
dialog.
2. Start a job and select spectra
Section titled “2. Start a job and select spectra”- Open Jobs and choose Start job.
- Enter a descriptive Job name.
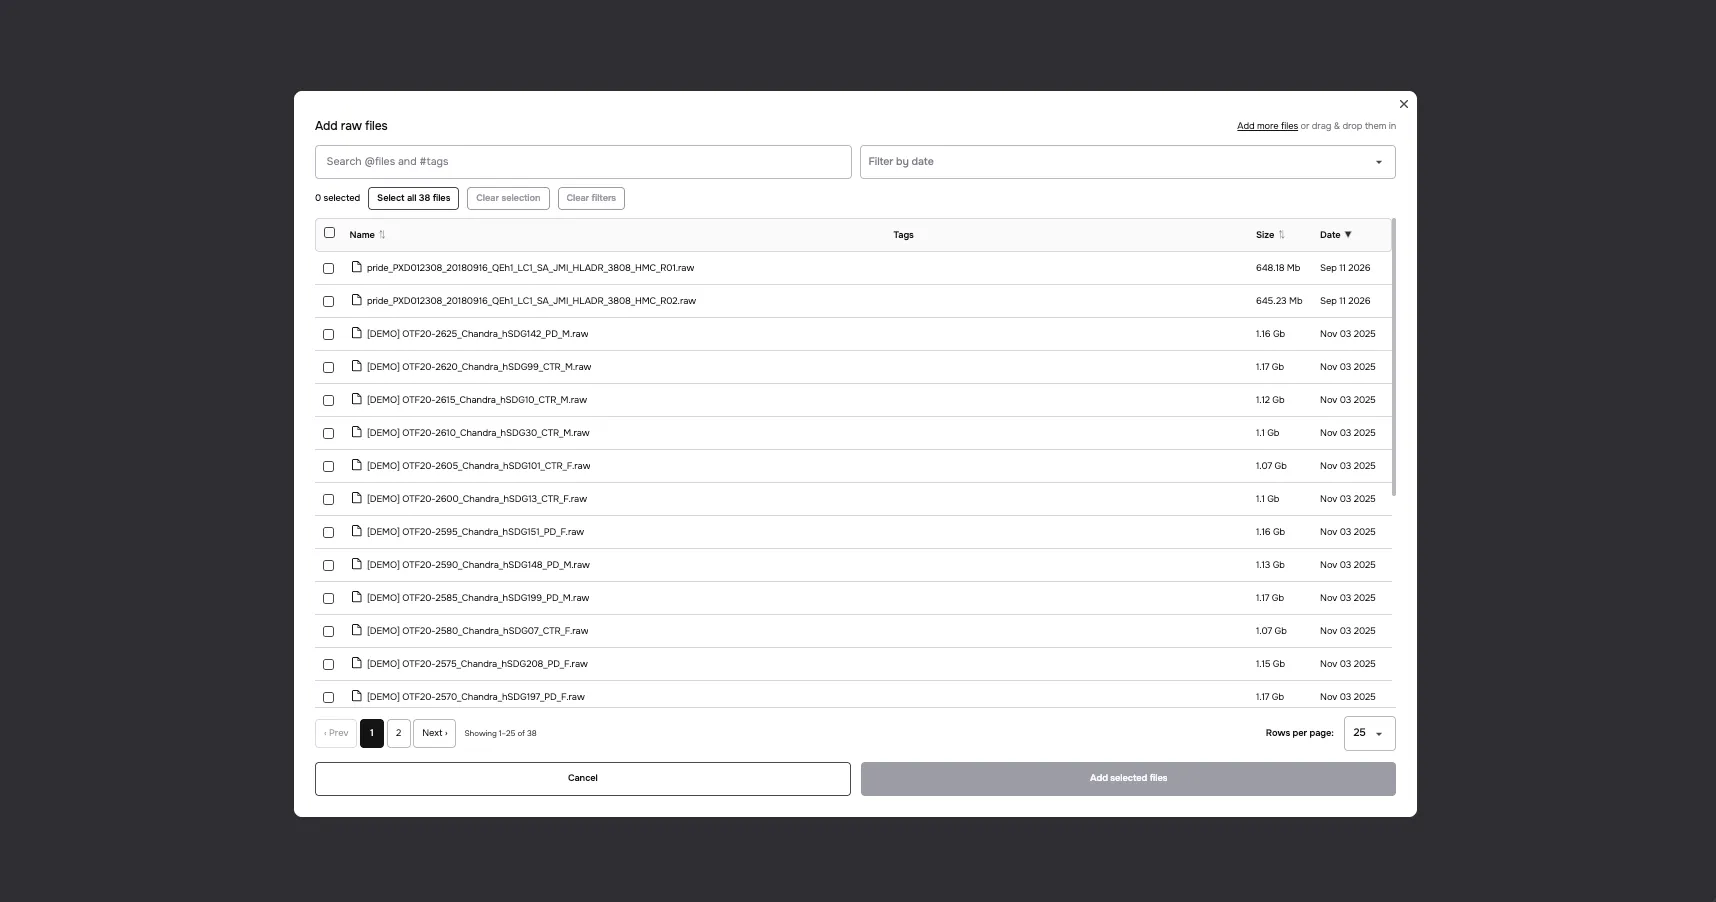
- Under Experimental Design, click Add to open the raw-file selector.
- Select the spectra files you want to process and click Add selected files.
The selector includes search by files and tags, a date filter, selection controls, and pagination. Use Add more files or drag and drop files into the dialog if the spectra are not yet uploaded.
Back on the setup page, confirm the filenames and number of files added. Use Add to include more files or Clear files to reset the selection.
3. Review the experimental design
Section titled “3. Review the experimental design”Each selected file appears in the Experimental Design table with editable Sample, Replicate, Fraction, and Group fields.
| Field | What to describe |
|---|---|
| Sample | Which biological sample the file represents. |
| Replicate | How repeated measurements are identified within your design. |
| Fraction | Which fraction the file represents when a sample is fractionated. |
| Group | The experimental condition or group associated with the sample. |
Check these assignments against your experiment rather than accepting the populated values without review. Distinguish independent biological samples from technical repeats, and keep fractions linked to their source sample.
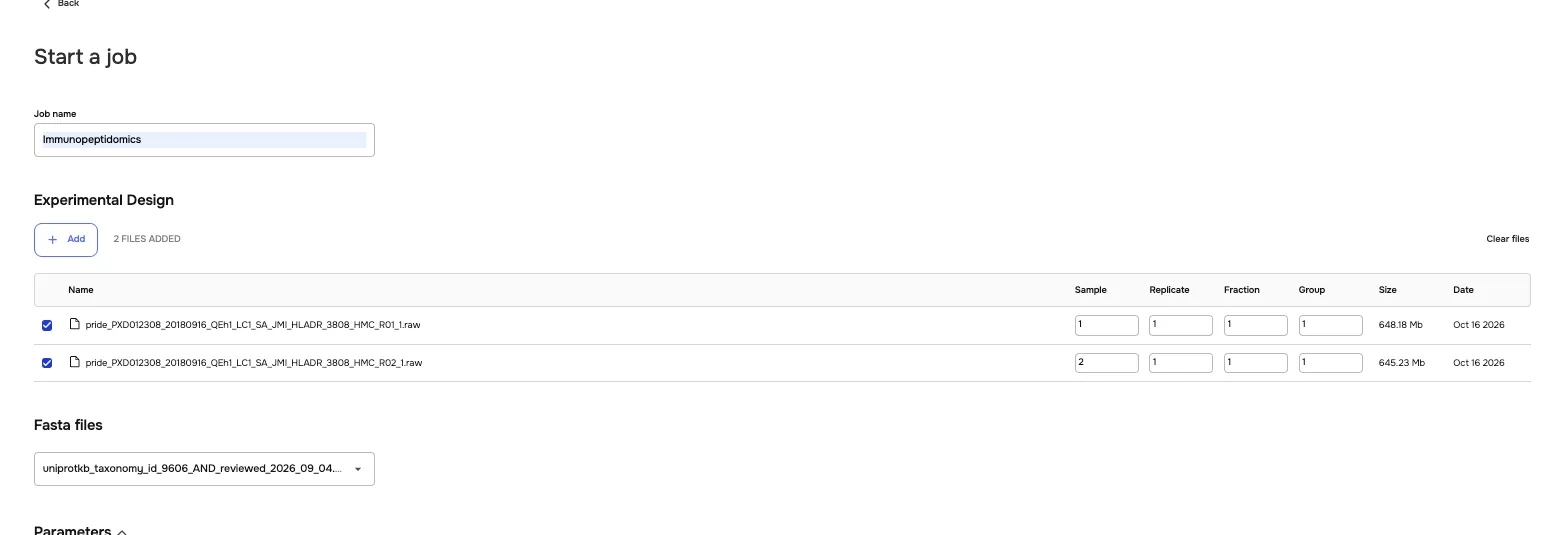
For complex designs, see the Experimental Design Guide. Retain separate metadata for participant pairing, time points, batches, and other details needed for downstream analysis.
4. Select the FASTA database
Section titled “4. Select the FASTA database”Choose your protein sequence database from Fasta files. Check the organism, database version, and sequence content before launching.
If the selector says a FASTA needs to be uploaded, return to Data and upload it, then select it in the job setup. A larger or different sequence database can affect both the search and its estimated credit cost.
5. Configure the search parameters
Section titled “5. Configure the search parameters”Expand Parameters if needed, then review each setting against how the samples were prepared and acquired.
| Setting | What to select or review |
|---|---|
| Acquisition mode | Choose DDA or DIA to match acquisition of the selected spectra. |
| Digestion enzyme | Select the digestion specificity appropriate to the experiment. Options include TRYPSIN, TRYPSIN_P, LYS_C, LYS_N, ARG_C, ASP_N, GLU_C, CHYMOTRYPSIN, and UNSPECIFIC. |
| Min peptide length | Choose the shortest peptide length to include in the search. |
| TMT probe | Select the labeling plex used, or TMT_PROBE_NONE for an experiment without TMT labeling. |
| Allowed missed cleavages | Match this to the digestion and the search you intend to perform. |
| Variable Modifications | Select the modifications relevant to the experiment. |
| Post processing FDR threshold | Review the percentage threshold used for identification filtering. The setup shown below displays 1%. |
| Match between runs | Choose whether to enable cross-run recovery for the selected files. This requires at least two files. |
The TMT selector includes 6-, 8-, 10-, 11-, 16-, and 18-plex options. The variable-modification selector includes oxidation (M), phosphorylation (STY), N-terminal acetylation, deamidation (NQ), and acetylation (K). Carbamidomethylation of cysteine (C) is applied as a fixed modification by default.
Review checked modifications as well as unchecked ones. Selecting additional modifications or changing digestion specificity changes the search space; choose settings for the actual experiment.
For an immunopeptidomics experiment without enzyme-specific cleavage, review UNSPECIFIC and the minimum peptide length for the intended search. A job name such as “Immunopeptidomics” does not configure those settings for you.
Match between runs
Section titled “Match between runs”Match between runs can recover identifications across files to reduce missing values. Consider whether the files belong in the same analysis and review the setting before launching.
For the underlying methods and the difference between DDA and DIA, see Match-Between-Runs in DDA and Match-Between-Runs in DIA.
6. Review credits and launch
Section titled “6. Review credits and launch”At the bottom of the setup page, review:
- Total cost: the estimated credits for the configured search.
- Your credits: your available balance.
- Add balance: the option shown for adding credits.
- Start job for … credits: the launch button showing the job’s cost.
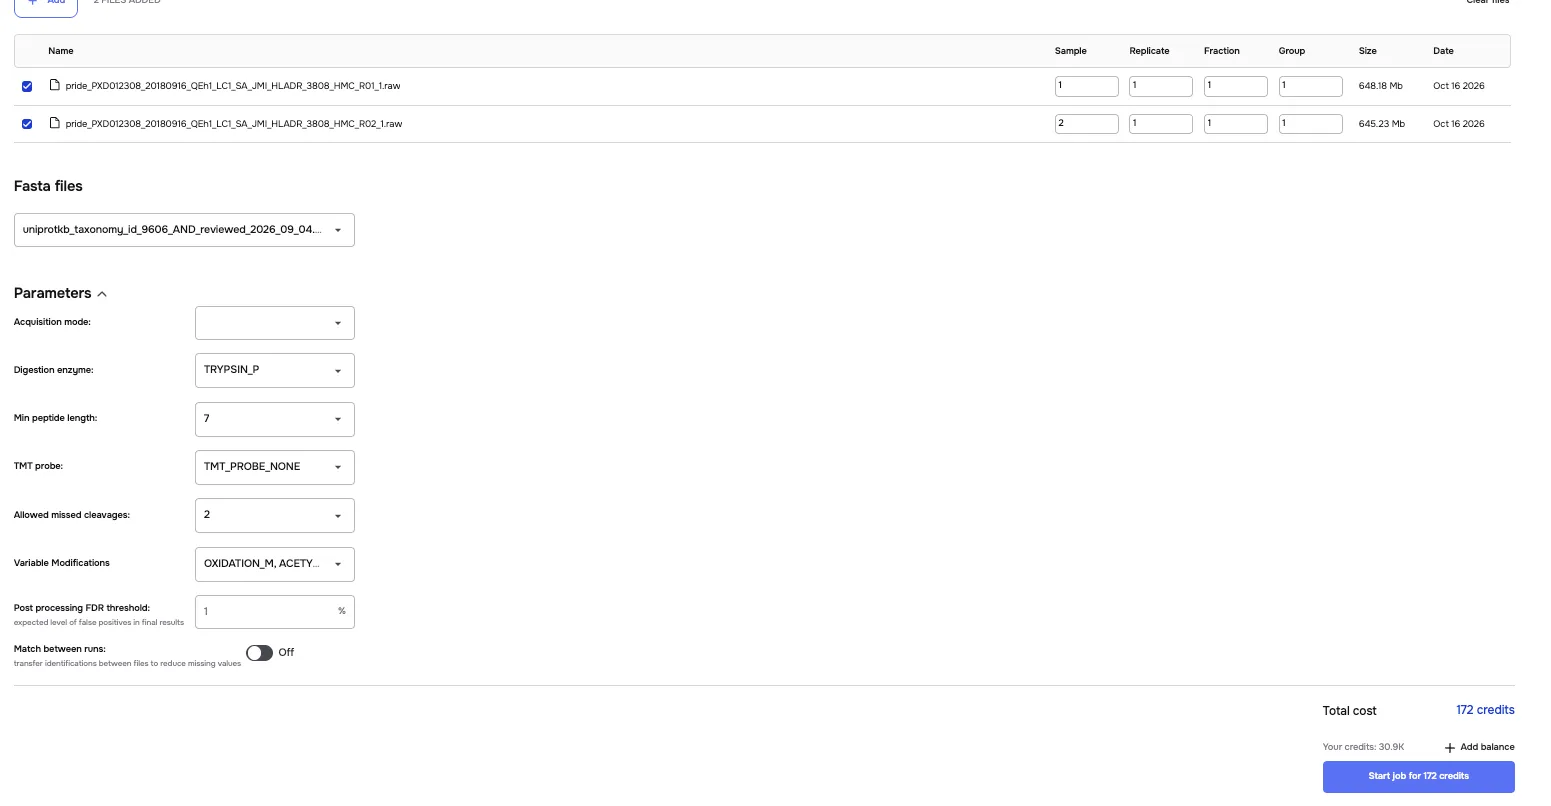
The screenshot is an interface example, not a recommended configuration or a standard price. Its displayed cost applies to the files and settings shown. Review the estimate again after changing files, FASTA, or parameters.
Before clicking Start job, confirm the spectra, design assignments, FASTA, acquisition mode, digestion, labeling, modifications, FDR threshold, and MBR selection.
If the launch button is unavailable, check that required inputs are complete and that your balance covers the estimated cost. See Plans and Credits for credit usage and failed-job refunds.
7. Monitor the job and explore results
Section titled “7. Monitor the job and explore results”Return to Jobs to monitor processing. You will receive an email notification when the job completes.
Open the completed job’s report to explore summary statistics, QC plots, identification and quantification tables, and supporting evidence such as annotated spectra, DIA chromatograms, and protein coverage. Use the report’s download controls to export results.
See Understanding Search Results for the output tables, confidence measures, and abundance columns. To continue with downstream analysis, open Chat and follow the Chat quickstart.
For help with a specialized search, email info@tesorai.com with your instrument, acquisition type, sample preparation, and desired outputs.